Klipper USB-to-CAN bus bridge
Klipper has also the posibillity to use the U2C as a USB-to-CAN bus bridge. This is a good solution if you want to use
the board as a CANBUS adapter for your printer and an MCU at the same time.
In the case of the BigTreeTech U2C, this solution has no advantages over the candlelight firmware, since no freely
usable pins are available on the board.
This guide is tested with the following boards:
- BigTreeTech U2C v1.1
This guide was verified on a Pi running MainsailOS
Configure Klipper firmware
Open the config interface of the Klipper firmware with following commands:
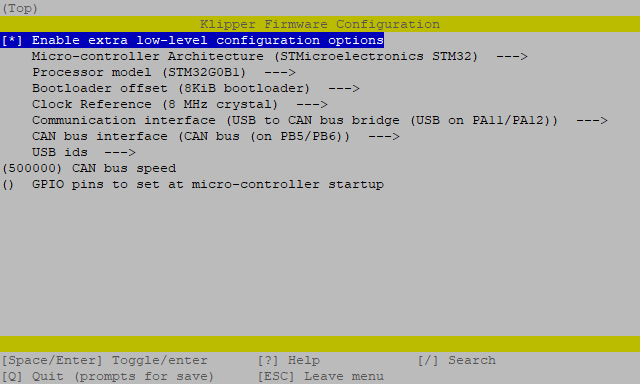
and set the following settings:- Enable extra low-level configuration options: check
- Micro-controller Architecture: STMicroelectronics STM32
- Processor model: STM32F072
- Bootloader offset: No bootloader (without CanBoot)
- Bootloader offset: 8KiB bootloader (with CanBoot)
- Clock Reference: 8 MHz crystal
- Communication interface: USB to CAN bus bridge (USB on PA11/PA12)
- CAN bus interface: CAN bus (on PB8/PB9)
- CAN bus speed: 500000
The result should look like this:
use q for exit and y for save these settings.
Now clear the cache and compile the Klipper firmware:
Flash Klipper
There are two ways to flash the Klipper firmware to the board.
- Flash the firmware via USB (without CanBoot)
- Flash the firmware via CAN (with CanBoot)
Flash Klipper via USB
This is the classic way to flash the firmware to the board.
First, you have to put the board into DFU mode. To do this, press and hold the boot button and then disconnect and
reconnect the power supply. With the command dfu-util -l, you can check if the board is in DFU mode.
It should then look like this:

If your board is in DFU mode, you can flash Klipper with the following command:

Flash Klipper via CAN
This is the recommended way to flash the firmware, when you use CanBoot on your board.
The U2C must be in the bootloader mode
The status LED should blink in the bootloader mode. If not, double press the reset button to enter the bootloader mode.
Find the UUID of your U2C:
The output should look like this:
With the UUID you have just read, you can now flash the board with:

Add can0 interface
Now you only have to create the interface in the OS. to do this, create the file /etc/network/interfaces.d/can0 and
fill it with the following content.
allow-hotplug can0
iface can0 can static
    bitrate 500000
    up ifconfig $IFACE txqueuelen 128
To save and close the nano editor:
ctrl+s => save file
ctrl+x => close editor
After a reboot, the can interface should be ready.
Add the MCU in Klipper (optional)
Finally, you can add the board to your Klipper printer.cfg with its UUID:
[mcu U2C]
canbus_uuid: <uuid>

# embedded temperature sensor
[temperature_sensor U2C]
sensor_type: temperature_mcu
sensor_mcu: U2C
min_temp: 0
max_temp: 100
If you don't know the UUID of your U2C, you can read it out with the following command:
The output should look like this: